Industrial Control Systems (ICS)/Operational Technology(OT) Security Homelab: Part 2 - Networking
Building an ICS/OT Security Homelab Link to heading
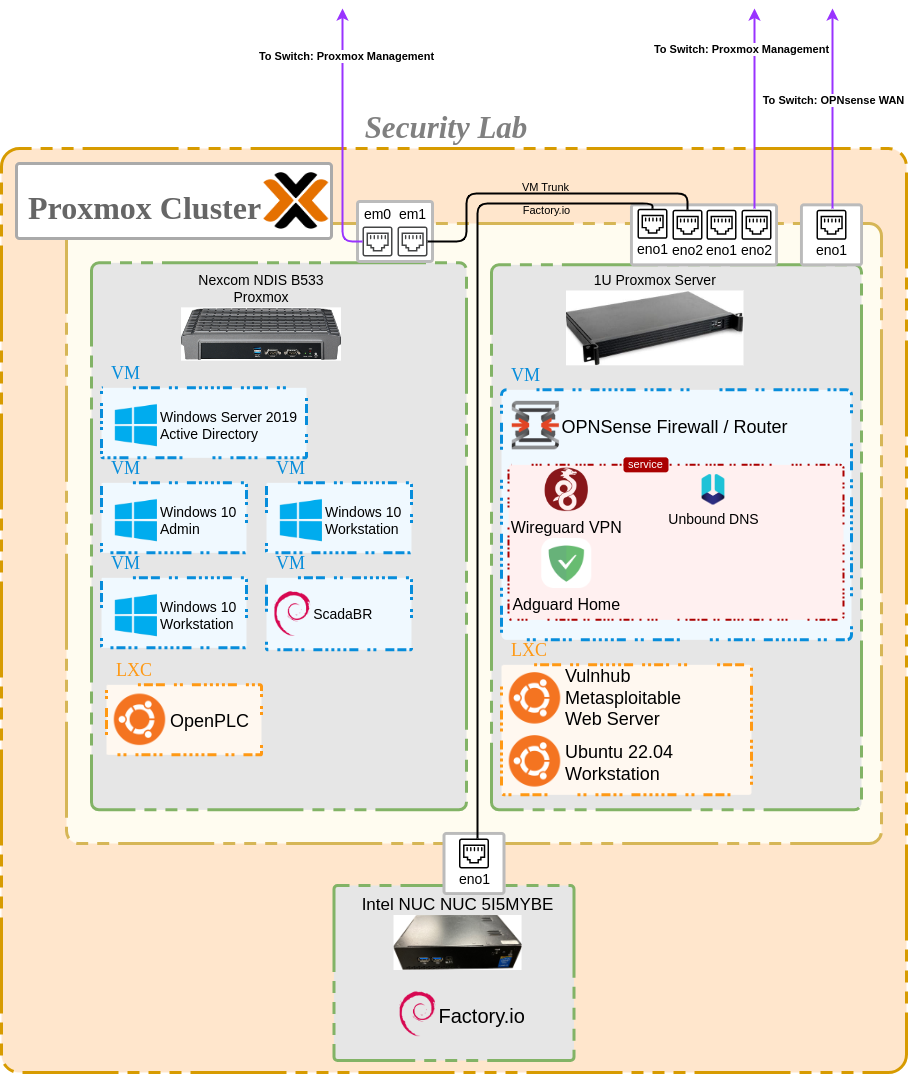
This is a follow-up to up my previous article on designing an ICS/OT Security Homelab. I plan on walking through the networking setup of my lab environment. I used 3 physical computers to create my lab environement with Proxmox as a hypervisor on two of the machines and Windows 10 on the third. However, this setup can be completed with just one computer if hardware is limited.
Step 1 - Home Network Subnet and Hypervisors Link to heading
There are many great tutorials out there on installing Proxmox, but I suggest the official documentation for a comprehensive guide. I used a Ventoy USB drive to install Proxmox VE 8 on my 1U server first, since this will be my main device running my OPNsense firewall/router. From a networking perspective, I chose to create a new /24 subnet & VLAN on my home network (172.16.150.0/24 & VLAN 150) and removed my typical DNS redirect & VPN rules which I enforce on my other networks. I gave my internal LAN access to this subnet and gave both Proxmox OS’s static IP addresses within this range for ease of management. The hypervisor layer will be transparent to the rest of the lab network I will be setting up.
Step 2 - Proxmox Virtual Network Setup Link to heading
The 1U server that I will be using has 1 built-in NIC on the motherboard and an additional quad-port NIC that I installed in an available PCI-E slot. One NIC is dedicated to the Proxmox management layer, leaving 4 NICs available for use by VMs. Virtualizing a firewall can be a bit of a mind-trick no matter how much you have prepared. I highly recommend drawing a diagram (to include MAC addresses & physical layer) to keep things straight. I connected one NIC to my home network again (physically connected to the switch) to use as a WAN port which was VLAN tagged at the switch to ensure it received an IP address within my new 172.16.150.0/24 subnet, as well as corresponding VLAN setup on my switch. This meant that there were now 4 IP addresses assigned within this subnet. The .1 (router gateway), .10 (OPNSense WAN), .5 (Proxmox Management), and .6 (Proxmox Management). Within Proxmox I created new Linux Bridges to assign IP ranges for two more NICs. One port would be VLAN-aware and connected to my second Proxmox server running the “Enterprise” (Windows/Active Directory), Supervisory, and Control networks. The other was connected to my Intel NUC running Factory I/O.
Step 3 - OPNsense Configuration Link to heading
The first VM I created on my 1U server was the OPNSense router. I setup the VM using the guided install and used the virtual networking assignments previously configured and labeled in Proxmox. I assigned the WAN interface and then configured Subnets/VLANs 5, 10, 15, 20, and 25 to correspond to the different zones within the security lab. Since I am running this router behind my existing OPNsense router, I made sure to allow RFC 1918 private networks on the WAN. I made some additional DNS configurations on both my home network & the security lab to ensure there were no upstream DNS conflicts. This guide is a great tutorial on ensuring this setup works without issue. I installed a few packages which I will be configuring later on, including Wireguard (VPN) and Adguard Home (DNS ad/malicious domain blocker). Since I will be running a webserver (Metasploitable2) accessible from the WAN, I also created a firewall rule on the WAN to allow HTTP traffic to the assigned IP address of the web server. This is an intentionally vulnerable server and will eventually serve as the primary means of ingress to the network.
To Be Continued Link to heading
This was an extremely brief overview of the physical/logical setup of my security lab. In the future I plan to go into more detail about some of the following:
- Running Metasplotable2 VM in Proxmox
- Windows VM setup in Proxmox
- Active Directory setup
- Scada LTS Docker configuration
- OpenPLC & Factory I/O setup
- Firewall rules for network segmentation
- Using Splunk & Wazuh SIEMs